Note: While we suggest utilizing Virtual Audio cable where necessary and when applicable, we’re unfortunately unable to support any technical issues with the software. For help with Virtual Audio Cable please reach out to VB-Audio here.

If you’re looking for Mac OS compatible software, you can get a similar effect with Soundflower

In the past, PC, Xbox and PlayStation have dominated the gaming market with better viewing angles, widescreen ratios and vibrant graphics. However, in recent years, mobile gaming platforms have taken a rise by delivering engaging gaming/viewing experiences, smooth performance and refresh rates for users. Learn more about how to stream mobile games on Twitch with our step-by-step guide.

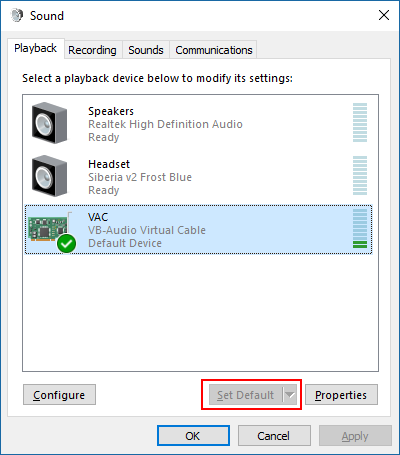
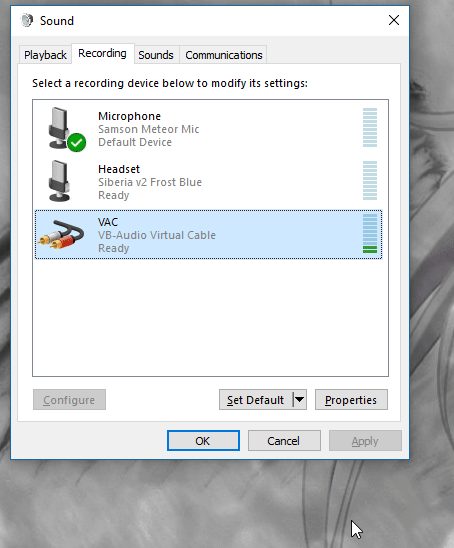
A common question that comes up from newer streamers is, “how can I split my game audio and my voice chat?”. By default, you can’t accomplish this when you capture your computer’s audio since you’re essentially capturing everything at once. But there must be a way to do this, right? One way is through a “VAC” or Virtual Audio Cable.

VAC’s allow you to separate different audio sources from each other and then control which ones actually get fed into your stream. Maybe you’ve got a producer that you don’t want your stream to hear or maybe you just don’t want your stream to hear your rowdy friends over Discord. VAC’s are a great tool for accomplishing these needs and more.

Let's get started

Setting up a VAC is relatively straightforward but can be confusing for a first time user. First, you’ll want to download the setup files from VB-Audio’s website. Once you’ve downloaded the files, you’ll want to run VBCABLE_Setup or VBCABLE_Setup_x64 based on if your PC is 32 bit or 64 bit in order to install the VAC driver.

After installing, you’ll want to go to the “Playback devices” section of your Sound settings to find your shiny new VAC and to start getting it all set up.

Setup virtual audio cables on your PC

Once there, you’ll want to click on your VAC and hit the big, “Set Default” button at the bottom of the window.

Setting up your virtual audio cables

Next, you’ll want to click over to the Recording tab where you’ll see another VAC. Right click on this cable, go to Properties, and then visit the Listen tab to finish your setup. Once there, you’ll want to check the box labeled “Listen to this device” and then select your headset or speakers of choice that you’d like to hear your audio through.

Setting up your virtual audio cables

Hiding voice communication

Now that you’re all set up you’re free to move on to one of the most popular application of VAC’s, hiding voice communication programs from your stream. For this example, we’ll be using Discord but the same process will work with whatever your voice chat of choice is.

To make sure your voice chat is off stream you’ll want to go into your Discord settings, open the Voice tab, and then set your Output Device to the headset or speakers you’ll be using instead of the VAC you just set up. This will make it so that only you’re able to hear your friends and their obscenities!

Setup virtual audio cables

We hope this guide helped you get up and running with your Virtual Audio Cable. If you need anymore help though, just hit us up either in our own Discord or through our in-app chat. Happy streaming!