
Facebook is the most popular social networking website in the world, with over 2.93 billion users as of July 2022. Over the years, it has expanded in various new ways, from virtual reality technology with the Quest headset to live streaming via Facebook Live.
When the topic of live streaming platforms comes up, Facebook’s own service, Facebook Live, comes to mind. While sites such as YouTube and Twitch have larger audiences than Facebook Live does, the sheer size and popularity of Facebook make it a great option for live streaming content. There’s always a guarantee that countless active users are on the site at any given time!
And if you want to just focus on live streaming on Facebook without any hassles, the smartest move will be to do it on Lightstream’s Studio 2, the most easy-to-use service out there. No downloads are required, you don’t have to invest in gear, and there’s no need for any software installation.
With Studio 2, you can now livestream to Facebook, YouTube, Twitter, LinkedIn, and all your favorite platforms at the same time.
What is Facebook Live?
So, what is Facebook Live? It is essentially a feature on the platform Facebook, which is owned by Meta Platforms, that allows users to broadcast real-time videos on Facebook. Viewers can engage with streams by commenting, reacting, and sharing during live streams.
While it is quite like other platforms such as YouTube and Twitch, Facebook Live does have its own distinct identity and nuances that set itself apart from its competitors. We’ll get into those later!
How to Go Live on Facebook?
Going live on Facebook is straightforward. It can be done through a web browser on the computer or via the Facebook mobile app. We’ll delve deeper into how one can go live on Facebook with either of these options later in this article.
Facebook Live Stream: The Settings You Need
What are the right settings for live streaming on Facebook? Well, Facebook itself has shared the recommended settings for live video streaming. Here are the recommended settings:
Video Options:
- Resolution: 1080p (1920 x 1080)
- Frames per second: 30
- Bitrate Range: 3,000-6,000 Kbps
- Keyframe: 2 seconds
- Video codec: H.264, Level 4.1
- 8-hour time limit
Audio Options:
- Sample rate: 44.1 kHz
- Channel layout: Stereo
- Bitrate: 129 Kbps
Go Live on Facebook from Your Mobile Phone
When it comes to live streaming, sometimes the easiest and most efficient way to broadcast yourself is from your mobile device. There are many reasons why some users prefer this method – it’s a simple process, you can quickly set it up, and it only requires your cell phone and an internet connection.
To go live from your phone, you’ll first need to make sure that either the Facebook app or Creator Studio app is installed on your device. Either of these apps can be used for going live on Facebook. But if neither is installed, do so before starting.
Go Live from Facebook App
It’s simple and easy to learn how to live stream on Facebook via your mobile phone by using the Facebook app. The process can be done with a cell phone with an internet connection, and the Facebook app – no other equipment or software is required.
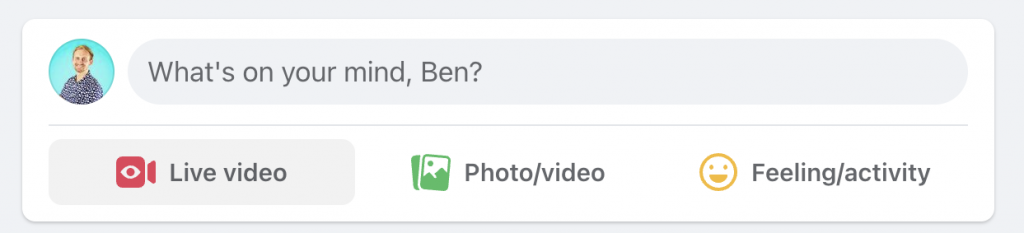
You need to first go to the page, group, event, or personal profile that you would like to live stream your video from. Next, click on the What’s on your mind? or Create Post button. After that, click on Live, which will pop up as an option.
Next, you’ll be prompted to write a description. You can describe what the live stream is about, tag friends, your location, add links, and much more. Also, you can limit access to only certain users. Once you’re done, click on Start Live Video. Then tap on Finish when you’re done live streaming.
Go Live Using Creator Studio App
Users can stream on Facebook Live using the Creator Studio app instead of the Facebook mobile app. Although it’s a different application, the process of live streaming using the Creator Studio app is very similar.
Open the app, and from the Home or Content Library tab, click on the compose icon on the top right corner. Next, select Live post. You’ll then need to write a description of your live stream. You can also tag friends, add your location and any other information.
Once you’re ready, select Start Live Video to start your broadcast. When your stream is over, select Finish to end your live broadcast – and that’s it!
Go Live on Facebook from Your Desktop
You can go live on FB through a desktop computer as well. While it’s not as easy to set up as on a mobile phone, live streaming from a desktop has its own benefits.
For one, users have additional options for their streaming setup, have more control over their live stream, and can provide higher quality through the use of advanced equipment, green-screen effects, and studio-level sound and video.
To go live from a desktop computer, all you need to do is open the Facebook website on a web browser.
As an aside, do remember that there’s Lightstream’s new easy-to-use service called Studio 2 that makes streaming a breeze – you can live stream from anywhere, anytime. Studio 2 lets you add overlays, automatic layouts, and multistream to several platforms at once, and more!
How to Live Stream from a Web Browser
Live streaming from a web browser is a straightforward process. You have to log in to your Facebook account and then go to your home page. In the space where you usually write a post, one of the options listed is Live Video. Click on it.
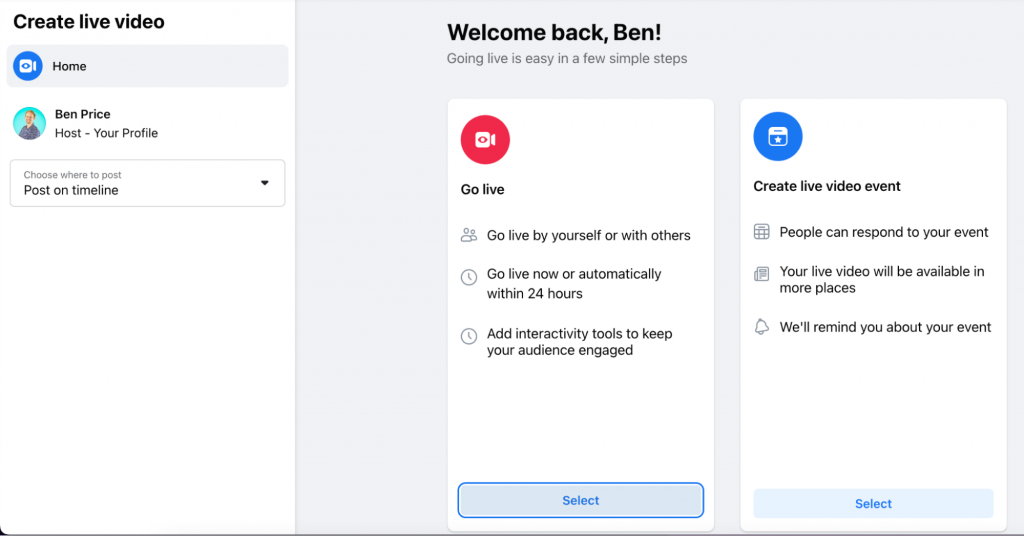
Next, you’ll see a screen where you’ll have the option to either go live or create a live video event. If you click on Go Live, you’ll start live streaming immediately.
If you click on Create Live Video Event, you’ll be able to create an event for your broadcast, which is a great way to attract attention to your live stream. You can invite others, and make it possible for people to find and watch your streaming event. Basically, you can gain a bigger audience by scheduling your streaming event.
You’ll next need to enter the details of your stream, including the name, start time, description, and details of co-hosts, if any, and select from various audio and video options.
Once you’re ready, click on the Go Live button at the bottom left corner of the screen – and your stream is live!
Select a Simple and Easy Service, Focus on Your Stream!
While it’s easy to live stream directly from Facebook, sometimes it’s nice to be able to add additional elements to your stream. While there are a number of streaming platforms out there, with Lightstream Studio 2, you can do that with ease!
Studio 2 has a bunch of awesome features, such as group streaming, mulitstreaming, and integrated layouts that will elevate your stream. Best of all, to use the new Lightstream service, you don’t need any additional software. An internet connection and a web browser are all you need to get going! No wonder users find Studio 2 extremely convenient and easy for live streaming.
4 Benefits of Live Streaming on Facebook
Check out these key advantages of using Facebook Live.
1. Built-in Audience (Your Friends on FB!)
One massive benefit of live streaming on Facebook is its built-in audience – your Facebook friends! Whenever you stream on Facebook, streams essentially are viewable in the same way that a regular Facebook post is – that is, if you’re streaming from your Facebook profile, your friends will be able to see your stream as they’re scrolling through the site.
This feature makes quickly building viewership far easier than on other live streaming platforms.
2. Less Competition Compared to Twitch, YouTube
Worried about not getting discovered? Facebook Live is undoubtedly the best choice compared to other streaming platforms such as Twitch and YouTube.
While it’s still a huge platform for live streaming, Facebook doesn’t have as many other broadcasters as Twitch and Youtube, so you should have an easier time gaining viewership.
3. Easy to Use and Set Up
Facebook Live is incredibly easy to use and set up, especially for mobile broadcasters. All that you really need to start a new stream is your mobile phone and an internet connection, as everything else is built into the app and your device.
As we’ve discussed before, there’s no need to set up any additional equipment or software.
4. Streams Save Automatically
Another advantage of live streaming on Facebook is that your streams get automatically saved after you go offline. Competing platforms such as Twitch won’t save your streams automatically, so it’s less work to do on Facebook.
If you like to see your streams stick around and return to them from time to time, then you’ll find this feature a big plus.
Key Features of Facebook Live

Facebook Live packs in plenty of great features. Here are the important ones you should take advantage of in your next stream!
- Polls
It allows users to create a live poll to share in your stream, allowing you to see your audience’s responses in real-time during your live broadcast. It’s great for more engagement with your audience. - Stories
This feature lets you share your live stream with friends directly on your Facebook Story, which can help you reach more viewers. - Links
Share the links to your website and social media handles directly on your live stream. It is a great way to have a call-to-action while streaming. - Comment Moderation
This feature allows you to moderate comments on your live stream. You can have control over who can comment and the frequency of comments (to limit spamming comments). Also, you can choose specific users to moderate comments for you – basically, assigning mods. - Badges
These can be awarded to specific users more engaged with your streaming content. Fans can earn badges by interacting with your streams more, such as sending “Stars” or just tuning in to watch more frequently. - Front Row
It allows you to highlight top fans and viewers in a special section on your stream. You can give Front Row viewers special shoutouts, to show appreciation for them while you’re live streaming. - Donations
You can add a “Donation” button to your video, which allows them to earn money from viewers while streaming live. Nonprofits that use Facebook’s payment platform can bypass fees and keep 100% of the donations. The feature is available for pages in specific locations. - “Live With” feature
This feature allows you to co-broadcast or host your Facebook live stream with other guests. - Live Shopping
Do you have products that you want to sell on Facebook? This feature allows you to do that by adding product listings to your live stream.
How to Analyze your Live Stream’s Performance
So you just finished broadcasting your stream on Facebook Live. You’re wondering how your stream did, right? Do you want to know what needs to be improved? Well, you can learn all of that information easily from Facebook.
To analyze your live video’s performance, navigate to the Insights option on the left-hand column of your Facebook page. Next, select the option Videos.
Next, scroll down to the section marked Top Videos. Choose a video from the menu, and then you’ll be able to view stats related to it.
Here’s precisely what you can view and analyze:
Pre-Recorded Videos: Users can see the total number of minutes viewed, unique viewers, video views, 10-second views, average percent completion, reactions, comments, and the number of shares.
Facebook Live Videos: All metrics listed for the above section can be viewed for Facebook Live videos, plus the peak number of live viewers, total number of views, average watch time, number of people reached, and demographics of the viewers who watched your live stream.
10 Crucial Tips for Effectively Using Facebook Live

When using Facebook Live, it can sometimes be a little tricky to get started. There are many things to learn and understand to improve as a streamer, so here are 10 tips that will help effectively use Facebook Live.
1. Strong and stable internet connection
One of the most important things to do when going live on Facebook is to ensure you have a strong and stable internet connection. It doesn’t matter how entertaining your stream is or how high-quality your content is if viewers can’t watch smoothly because of a poor internet connection at your end.
Additionally, if you’re using a simple and easy service such as Studio 2, then that stable internet connection is all that you’ll need to get started!
Those who go live from their mobile devices should always try to ensure to use Wi-Fi whenever possible, and users streaming from a desktop or laptop should ensure they are using a trusted router and preferably use an ethernet cable for faster internet speed.
2. Broadcast for longer spells
Many new streamers make a huge mistake by keeping their broadcasts far too short. Streaming for short periods makes it harder for streamers to be discovered and seen by new audiences. It’s essential to try to live stream for longer periods. Streamers on mobile devices tend to make this mistake more often.
3. Notify people when you’ll go live
If you want people to watch your live streams, it’s always a good idea to notify them ahead of time so they know when you’ll be going live. If others are aware of when you’re going to be live, there’s a far greater chance that they’ll be able to slot time to watch your content and tune in. Notifying is easy to do. It only takes a minute to send out a tweet or a status update saying when you’ll go live.
4. Schedule should have consistency
Having a streaming schedule is very important. Streaming regularly and as per a schedule is great both for you and your viewers. While scheduling can help you get into the habit of streaming regularly and at the same time, your viewers will get a clear idea of when to expect you to go live.
Of course, it’s alright to break from your schedule now and then, but canceling or changing around streaming times too often isn’t a good habit to get into. Ideally, make a schedule and stick to it!
5. Engage with your viewers
Properly engaging with your audience is very important for live streaming. If users are commenting on your stream, try responding to them or strike up a conversation. For example, if a viewer asks you a question, don’t just answer them – start a dialogue or a discussion. It can be a great way to keep streams from becoming dull and helps to avoid awkward silence.
6. Speak constantly when you’re live
Always try to avoid radio silence. Whenever you’re live, ensure you’re consistently talking to engage your viewers and keep them from getting bored. By constantly engaging, your viewers will find out more interesting, and as a result, you can retain viewership.
7. Be creative and unique
When you go live, it’s essential to think creatively! It means coming up with ideas for streams that will make you stand out in the crowd and make viewers want to come back for more.
It might mean coming up with a streaming gimmick or some fun and unique thing to do on air that others will enjoy watching and will have novelty value. Don’t just simply imitate or copy what popular streamers do. Try something different and original!
8. Go live where it isn’t too noisy
It’s important to stream in an area that isn’t too noisy. It mainly pertains to broadcasters who typically stream on mobile devices, as you may be streaming outdoors or in public places.
But even broadcasters who stream from home should keep this in mind. Streaming while your lawn is being mowed, or when children are playing in the next room, or other similar circumstances should be avoided as it will impact the sound quality of your stream.
9. Send out a Call-to-Action
Before you end a stream, remember to put up a call-to-action. It can either remind viewers to follow you, like your Facebook page, donate, subscribe to your accounts on other social media platforms, or anything else. Having a call-to-action increases the likelihood of viewers acting on it.
No Downloads, No Installations, Enjoy Hassle-free Streaming!
Broadcasting on Facebook directly through Facebook’s website comes with a few drawbacks. For one, there are a limited number of layouts you can use. Also, it’s impossible to use certain features such as multistreaming or group streaming.
Studio 2 solves these problems for you! The popular and trusted Lightstream tool offers these features and more, allowing you to live stream with friends and even multistream, where you’ll be able to broadcast yourself onto Facebook Live and other popular platforms simultaneously.
The best thing with Studio 2 is that – as you know by now – it takes hassles such as installations and equipment purchase out of your way so you can focus on your stream.